Connectors between compartment shape entries with DSL Tools – part 2

Tags: , , , , ,
7 Comments »

[Update (2008-05-21): This code is now hosted at CodePlex as part of JaDAL. And a follow-up article was published.]

Previously on…

This article is part of a series. A table of contents can be found at the end of the first article. In that article you can also find a brief overview.

    User guide

    If you read this article to this point you will properly use or at least evaluate the CompartmentMapping library. I will provide you with a step-by-step tutorial. There are pretty some steps, but its the shortest way I could imagine to create my solution. Please give it a try. 🙂

    1. You need TTxGen to generate some code from my templates. See my last article for more information and a workaround for an installation problem.
    2. I assume you have a DSL solution and at least two Domain Classes mapped to two compartment shapes and two more Domain Classes used as entries of the compartment shapes created. In my example these classes are called Parent1, Entry1, Parent2 and Entry2.
      The entries need a unique identifier. You could use a name property for this, but there will be some difficulties if the user creates two entries in one shape with the same name, so I will use a guid. (Don’t forget to create a new guid in the constructor or another proper place.)
    3. Create a Reference Relationship from Parent1 to Parent2. This will be automatically named Parent1ReferencesParent2. We will use this reference to present the relationship from one entry to the other. I would like to create Reference Relationships from this relationship to the entries, but relationships of relationships are not supported. We have to store the guids of the entries in the relationship and add two Domain Properties for this purpose to it. I named them fromEntry and toEntry.
      DslDefinition 
    4. Set the Allows Duplicates property of the Parent1ReferencesParent2 relationship to true.
    5. Set the Is Custom property of the Connection Builder (Parent1ReferencesParent2Builder) in the DSL Explorer to true.
    6. Add a reference to CompartmentMapping.dll to both the Dsl and DslPackage project.
    7. Add a new xml file (in my example CompartmentMappings.xml) to your solution and write the following code in it:
      <?xml version="1.0" encoding="utf-8" ?>
      <CompartmentConnections
          xmlns:xsi="http://www.w3.org/2001/XMLSchema-instance"
          xsi:noNamespaceSchemaLocation="CompartmentMappings.xsd"
          namespace="BenjaminSchroeter.CompartmentMappingExample" >
        <CompartmentConnection>
          <CompartmentSource>
            <DomainClass name="Parent1"/>
            <EntryDomainClass name="Entry1"/>
            <Shape name="CompartmentShape1" />
          </CompartmentSource>
          <CompartmentTarget>
            <DomainClass name="Parent2" />
            <EntryDomainClass name="Entry2" />
            <Shape name="CompartmentShape2" />
          </CompartmentTarget>
          <Connection name="Parent1ReferencesParent2">
            <Shape name="Connector" />
          </Connection>
        </CompartmentConnection>
      </CompartmentConnections>

      (If you place the xsd file in the same directory you get IntelliSense and error checking for free.)

    8. Place the CompartmentConnections.tt file in the same directory and right-click on the xml file and choose Generate xGen Template. A CompartmentMappings_xGen.tt file will be created below the xml file and there you have to add the following lines:
      <#@ ParentFileInjector processor="TTxGenDirectiveProcessor" 
          requires="fileName='CompartmentMappings.xml'" #>
      <#@ include file="CompartmentConnections.tt" #>

      (Be sure you use the right xml file name here.)

      Now press the Transform All Templates Button in the Solution Explorer to generate the the code from this template.

    9. Now you have to write code by yourself (nearly by yourself, the frames are generated, too). Take a look at the generated cs file CompartmentConnections_xGen.cs.

      At the top you will find commented code. Copy this code to a new cs file and remove the comments. All code you will write for the compartment mappings you will write in this file.

    10. Complete the CreateElementLink() method in this file. Here you have to add code to store the selected compartment entries for source and target in the properties of the relationship (see 3).
      protected override ElementLink CreateElementLink(Parent1 source,
        SelectedCompartmentPartType sourcePartType,
        Entry1 sourceEntry,
        Parent2 target,
        SelectedCompartmentPartType targetPartType,
        Entry2 targetEntry)
      {
          Parent1ReferencesParent2 result = 
              new Parent1ReferencesParent2(source, target);
          result.fromEntry = sourceEntry.Guid;
          result.toEntry = targetEntry.Guid;
          return result;
      }
    11. In the CreateElementLink() method you have stored the source and target entry information somewhere; my library does not know about this location. So we need two more methods to compare an entry with a relationship and answer the question "Is this entry the source of a given relationship?" and the same for the target. These code resists in the same file:
      public override bool IsEntryConnectionSource
          (Entry1 entry, Parent1ReferencesParent2 connection)
      {
          if (entry == null)
              return false;
          return connection.fromEntry.Equals(entry.Guid);
      }
      public override bool IsEntryConnectionTarget
          (Entry2 entry, Parent1ReferencesParent2 connection)
      {
          if (entry == null)
              return false;
          return connection.toEntry.Equals(entry.Guid);
      }

      Always care for entry == null this will be used to check whether the head of the shape is meant. Even if you do not allow the head as source or target this method will be called with a null parameter from time to time.

    12. Create a partial class for your Domain Model (CompartmentMappingExampleDomainModel) and add the following methods.
      protected override Type[] GetCustomDomainModelTypes()
      {
        return CompartmentMappingUtil.AllCompartmentMappingRules(this);
      }

      (If you have already some custom rules, you can use an overloaded version of the AllCompartmentMappingRules() method.)

    13. In the DslPackage project create a partial class for the generated Command Set and add the following code:

      protected override IList<MenuCommand> GetMenuCommands()
      {
          return CompartmentMappingUtil.RemoveRerouteCommand
                                      (base.GetMenuCommands());
      }

    That’s all. Only 13 steps, a few settings and conventions and 10 lines of C# code to write. I know it is not very easy but I think it is ok. And the best: as you will see it is working.

    Now compile and start you solution. You can now create connectors from one entry of the Parent1 shape to an entry of the Parent2 shape. Great – isn’t it?

    mapping 

    Take a look at the properties in the Properties window when selecting a connector. You see the guids of the corresponding entries and can use them in your code when working with this connections for code generation or whatever you need to do.

    Advanced options

    There are some more options besides the basics described above to configure and extend the compartment mappings.

    Some of them can easily turned on in the xml file:

    • For CompartmentSource and CompartmentTarget you can specify an attribute called allowHeadAsSource (and allowHeadAsTarget respectively) and set it to true, to allow the head of the compartment shape as source or target. Remember, if you do this the CreateElementLink() method will be called with null values for the entries and you have to handle this.
    • On the Connection element there are two more optional attributes, too.

      If you set allowSelfReference to true the user can create connections from one entry of one shape to another (or the same) entry of the same shape (source = target). This makes only sense if you specify CompartmentSource and CompartmentTarget to be the same Domain Class and the same shape.

      With the suppressEntryDeletePropagation attribute set to true you suppress the deletion of the connection when a corresponding compartment entry is deleted. Be careful with this setting: Wrong connections will remain in your model and produce ugly diagrams.

    • One of source and target can be a regular shape (that is a geometry or image shape and not a compartment shape). Replace either CompartmentSource with Source or CompartmentTarget with Target. For these elements you don’t need to define a EntryDomainClass element since regular shapes do not have entries.

    You can add even more code to the C# file from step 9 to 11. There are two more methods you can override: CanAcceptAsCompartmentSource() and CanAcceptAsCompartmentSourceAndTarget(). If you do so, the DSL editor will ask your code while the user moves the mouse over shapes when creating the connection to identify the current shape and entry as a valid source or target in you scenario. It is pretty much the same pattern as used in the DSL Tools itself. But remember, this method will be called very often und should have a very short running time.

    Download

    The archive contains the library both as a compiled dll and as source code and the Example DSL created in this article.

    Update

    This code is now part of the JaDAL – Just another DSL-Tools Addon Library project. Please download the current version from that page. The download over at CodePlex contains the source code described here, an example DSL language and the library as a binary. Future enhancements of the code will be published there, too.

    Upcoming articles

    Part 3 and part 4 of this series will give an in depth view into the internals of the library.

    Connectors between compartment shape entries with DSL Tools – part 1

    Tags: , , , , ,
    6 Comments »

    [Update (2008-05-21): This code is now hosted at CodePlex as part of JaDAL. And a follow-up article was published.]

    This is the first part of an article series to this topic on a library I wrote. At the end of this article you find links to the upcoming articles. The download can be found at part 2 along with a brief "user guide".

    Let’s begin…

    With DSL Tools you get compartment shapes for your diagrams that look very much like the class-shapes in the graphical class designer of Visual Studio. These compartment shapes are very useful in many model designs and can visualize much information in a compact way. The user can collapse the whole shape (Shape 4) or single compartment lists (Shape 1, Shape 6) to save even more space on his diagram.

    compartmentExample

    Like in the class designer you can only create connections from one shape to another not from one compartment entry to a shape or another compartment entry. The ability to create such connectors can simplify many DSL designs and on the VSX forum a couple of people asked for this feature. But there is a simple answer to this topic:

    "This would be a useful feature, but unfortunately it doesn’t fit into our plans for DSL tools V1.  It’s something we’ll consider for the next version, though."
    [Grayson Myers MSFT]

    What should I do? Change my DSL and make it complicated and less useful because of a limitation of the framework? Wait for an upcoming Version without a release date and without knowing that it will work for me? This all sounds like a very bad idea to me. So let’s change or extend the framework!

    I wrote a library to bring this feature to the DSL Tools. With this library you can

    • Create connections between compartment entries of two different compartment shapes (or even within the same shape, if you like). You can specify the allowed type of the source or target shape or select the same type for source and target. You can also constraint the allowed compartment entries by type if your source (or target) compartment shapes define more then one compartment group.
    • The user experience isn’t changed: The user creates this connections with drag and drop as usual in the generated DSL model designer.
    • You can add code to write custom accept rules for this connection.
    • You can decide how the information of the source and target entry is stored in the generated Domain Relationship.
    • If you want, the whole compartment shape can be the source or target of a connection as well. This will be visualized through a connector from or to the head of the shape.
    • When the user deletes the compartment entry, the connection will be automatically deleted, too. (optional)
    • One of source or target can be a regular shape. E.g. you can create a connector where the source is a compartment entry of a certain compartment shape and the target is a regular geometry or image shape. Since the update (see top of article) both source and target can be a regular shape, too or a base class mapped to a regular and compartment shape.
    • All other properties, extension points, configuration, visualizations and so on will be used from DSL Tools.

    Since I can not change the code of the DSL Tools framework and libraries and I want not change the generated code in your DSL project (this will be overwritten each time you generate it) I started to write a library. To use this library in your DSL project you have to design some elements in your DSL as described by me later on. It is curial to set certain properties or it will not work as expected. Then you have to add come code to your DSL project to extend the partial classes generated by the DSL Tools code generator. To minimize the amount of  hand written code I created a code generator as well. With this generator you need only to specify the connection you want to use as a compartment entry connection. Then only one class with three methods is left to be filled with code.

    Because of the limitations of the DSL Tools framework and the given extension points not everything is working as someone will expect. But at this moment I can only think of one feature you may miss with my solution:

    • Obviously the connector have to start on the left or right side of the shape just besides the corresponding compartment entry. Every time you change (add or remove entries; collapse or expand the shape) or move the compartment shape this connection points will be recalculated.
      The routing of the connector may change when this happens, but it will always use the routing algorithm you already know within the DSL editors. To ensure a correct visual presentation of the connector the user MUST NOT change the routing! For every connector under the control of my library the user CANNOT change the routing. – In my opinion this is a small price for the features you can add to the DSL framework.

    Upcoming articles

    • This article showed the basics of what my library can do.
    • In the next article I will give you a brief user guide on how to provide this functionality to your DSL developments. The download of the library, the source code and examples will be there as well.
    • The third part gives you a deeper look inside of the library and shows you the way it is working
    • In the last part I will explain a way of finding and removing some default commands from the DSL editor.

    Codegeneration with CodeSmith and Orcas T4

    Tags: , , ,
    4 Comments »

    As a professional software developer you will come one day to the point where you want to generate some source code or text files instead of writing it yourself. I don’t speak about dynamic web pages or big frameworks with code generation. But I bet in some of your last projects you could generate some code, too.

    Maybe you do this already with a codegenerator of some kind or by using a scripting language like PHP or Python. Maybe you have reasons not to generate it and write it by yourself. Very often these reasons are bad reasons: you don’t know any adequate tool, you don’t want to buy one or you don’t have the time to learn it.

    CodeSmith

    The first time I had to generate source code we wanted to generate a library to access the data of an external software in a type safe way with real properties and not throwing around with strings. The input was a xml configuration file of this software.

    For this aim we used a freeware code generator named CodeSmith. CodeSmith is a templating engine using C# or Visual Basic as embedded language and a syntax that is very similar to ASP. You can use all .Net framework classes and function within your template, load your own or 3rd party libraries into it and use all these classes as parameter of the template.

    A few years later we had to generate code again and discovered that CodeSmith became a company that sells an enhanced standard and professional version of the well known tool. They added a very powerful IDE to create and edit your templates and for the professional version Visual Studio integration and an API to use the engine with your templates in your applications.
    After buying the professional version we discovered that we cannot use CodeSmith for our needs. We wanted to build a product that generates code for the end-user on his machine but you are not allowed to distribute the CodeSmith libraries that are needed when you use the API. It took a long time for me to imagine a good usecases for an API like this if I cannot give my software away (or every user of my software has to buy a $399 licence of CodeSmith).
    Fortunately the old freeware version was capable of this. It can compile your template to C# code that runs without any external reference or library. You can add this code to your application and that’s it. You do not have the fancy IDE (or you can buy a CodeSmith licence and use the IDE but process your template with the freeware version – the syntax is nearly the same) and maybe not all of the features of the new version but it is free and works. The freeware version is still downloadable on their webpage.

    T4 – Text Templating Transformation Toolkit

    Visual Studio 2008 (aka. Orcas) comes with its own templating engine that is a free part of every Visual Studio Professional or Team System installation (free as in: you paid for it with your Visual Studio licence). This engine is powerful with C# (or even C# 3.0) and Visual Basic as language and access the whole .Net framework and external assemblies as well.

    Unfortunately there is no editor integrated in Visual Studio for the TT files. And even worse, you cannot use the engine out of the box. The DSL Tools use it but if you want to do so, you have to write code and access the public interfaces. But for both drawbacks there are solutions.

    You can download a beta version of the T4 Editor. It integrates in Visual Studio (the download for the Beta 2 works fine with the final version of Visual Studio for me, too) and has syntax highlighting for template files. It comes also with some Intellisense, but only for the template syntax and not for code you write inside your templates.

    Then there is TTxGen that allows you to use every file you want as input for a template in a Visual Studio solution. It adds a template to the input file and generates the output from the input using the template. It’s really that easy. TTxGen is a very lightweight thing (only 45 kByte for the installer) because it delegates most of the work to the T4 stuff from Microsoft and adds only a few menus to Visual Studio.
    I had some trouble with the installation of the February 2008 CTP release. You can find my workaround at the discussions over at MSDN Code Gallery.

    For one of my DSL Tools add-on libraries I use TTxGen to generate code from a xml file. Later I will post an article with the source code of the template that can be used as an example.

    "GOA Winforms" is amazing

    Tags: , , ,
    2 Comments »

    Today my world changed a little bit. My friend Rob asked me to write a fun application: You answer some questions and it tells you something, fairly simple. But he wanted to put it up his blog… oh-oh… Well… I am not much of a network- or server-guy and he runs a WordPress-blog on a hosted linux maschine, so .NET wouldn’t work. I started thinking about HTML-forms and java-script stuff but I don’t think it works too well with blog-posts and – by the way – I hate that sh*t, so I dropped it after one second.

    Flash or Silverlight?

    Then I thought about Flash and I guess that’s what you would use for a little game like that. But I don’t have it, I don’t want to buy it (is there a free version?) and I don’t have the time to learn it; although I think it’s pretty cool.

    But… wait a moment? What about Silverlight? Isn’t it similar to Flash? I checked it out and I tell you: No, it’s not. Or nor yet. I downloaded the SDK, played a bit, read some pages. But… it’s just not the way you want it to be. Works only with java-script, isn’t easy, needs a lot of learning, doesn’t give you any moments of success. It’s just no fun.

    Here comes GOA

    So I complained in a chat with Benjamin. "Do I have to write a .NET-to-Flash-converter first?" He said: "There is one." – "WHAT?" – "Yes, I heard about something like that." and a minute later he produced a link to a product called "Goa Winforms". I could hardly believe my eyes. They claim to have an engine to compile .NET-Winform-Code to Flash (.swf) applications.

    The basic version is free and comes as a 3MB installer, which integrates the tool smoothly into VS2005. After installing VS comes up with new project-types.

    Goa_Projects

    I choose the GOA Application and VS prepares a solution with a new project and a file that looks like a regular C#-file (the extension is .ccs by the way). Okay, let’s start it… Wow! A real Flash-application comes up. So far it’s just an empty form with one button – but it runs. It runs!!!

    I think they implemented most of the common gui-components for flash and engineered a compiler that somehow converts C#-Code into an flash-interpretable format. Cool achievement!

    Now, let’s design a fancy gui… but… were is the designer? In brief: There is none. You can’t design the gui as you usually would. Ouch. Okay, there is a solution to this ‘issue’, but it hurts and can’t be more than an temporary workaround: Add a Windows-application project to your solution, design your gui and copy the generated code to the GOA-application file.

    Done? No. When you try to compile it, you get a bunch of errors and you have to manually delete any usages of properties that have been generated but are not supported by the GOA-version of the corresponding controls.

    Now it works and you can continue to write your logic… but that takes us to another annoying point: The integration to Visual Studio could be improved a lot. Syntax-highlighting and intellisense work, but that’s it. Auto-re-indentation doesn’t work, errors and warnings do not all occur in the "Error-List"-Window, and my loved ReSharper didn’t recognize the code; but maybe that’s just because of the extension .css – is there a way to make ReSharper recognize those files as regular C#-files? Please let me know.

    That’s was a lot of bleating, but lord don’t let me be misunderstood: It’s works and you get a lot for your effort; I had the fun application for Rob done in three hours (including learning, fighting, reading) and I am happy with it.

    There is a lot more to play around with – like dymanic creation of controls – but it should be fine for the most purposes.

    GOA vs. Silverlight

    As soon as the GOA guys can get rid of the drawbacks, I think this approach has great potential. As long as Silverlight is ugly, "GOA Winforms" is something to really keep an eye on. And Silverlight 2.0 hasn’t proven yet that it can beat Flash. So, let’s see if Microsoft will take
    the challenge.

    Bonustrack

    By the way.. here is the "application". It’s in German and doesn’t do much… but blame Rob for that 🙂


    [kml_flashembed movie=”http://www.ticklishtechs.net/wp-content/uploads/2008/02/goaapplication1.swf” height=”270″ width=”350″ /]

    Arisan released. Interface between ARIS Toolset and .NET

    Tags: , ,
    No Comments »

    Since there is not advertising on this blog, we just have to carry out our duty to officially inform you about the release of our first commercial software product 🙂 :

    Arisan, an interface connecting the business process modelling software ARIS Toolset (by IDS Scheer) to .NET.

    After almost 2 years of development we put up the  website www.arisan.de today.

    A quite exciting moment and we hope for many downloads of the trial version. We are very confident in it’s technical quality and think Arisan is a very useful tool to work with ARIS in a sophisticated and professional way.

    If you or one of your customers uses ARIS and if you are reading this blog because of it’s .NET content, you should give it a try.

    Windows Live Writer Plugin for <code> in WordPress

    Tags: , , ,
    No Comments »

    I wrote the last posts (and also this one) with Windows Live Writer (aka. WLW). It is a very powerful offline client for writing posts to many different blog systems. Although it is a Microsoft software you can post to WordPress blogs.

    But I was missing one function I’m using very often when I write posts on programming. There is no way in the WYSIWYG editor of WLW to format Text like this. In WordPress you can use the <code></code> tags for code-like formatting. But in WLW I had to switch to the HTML Code view to add these tags.

    Since there is a good API to add features to WLW I tried to write my first Windows Live Write Plugin:

    [WriterPlugin("{52D29C0E-49E6-4353-B58C-458F86CA1E2B}", 
                                               "Inline Code Plugin")]
    [InsertableContentSource("Inline Code")]
    public class WlwInlineCodePlugin : ContentSource
    {
        public override DialogResult CreateContent
                    (IWin32Window dialogOwner, ref string newContent)
        {
            InputBox box = new InputBox("Insert inline code", 
    "Insert the following in a <code> block:",""); DialogResult result = box.ShowDialog(dialogOwner); if (result == DialogResult.OK) newContent = "<code>" + box.Input + "</code>"; return result; } }

    That’s really all the code (besides the InputBox. Just add the two attributes to a class and override the CreateContent() method. The code in this method is straight forward: Show some dialog, create the new HTML content and return the DialogResult.

    After compiling you have to put the dll into the Plugin directory of your WLW installation and you will see a new entry in the Insert menu and on the sidebar. This entry is called "Insert Inline Code…" (ah, the text from the attribute goes there). When you click it a small dialog asks for the text and if you exit the dialog with the OK button this text is added to your document inside of <Code> tags.

    In the zip file you will find the source code and the compiled dll.

    Adding properties to Domain Classes at runtime with DSL Tools

    Tags: , , , ,
    3 Comments »

    Each element you can see in a DSL Diagram within the DSL editor is based on a Domain Class defined in your DSL Definition. If the user selects on of these shapes in the Editor he can change the values of the defined Domain Properties in the well known Properties Window of Visual Studio, but only Properties declared at design time will be shown in the Properties Window.

    For some reason I want to change the number, name and type of the properties at runtime. E.g. some code will add some properties to one shape while the user works with the DSL model. Different shapes based on the same Domain Class should be able to display different properties as well. Such a behavior is not support by the DSL Tools in the current version, so I build a small library as a workaround to provide this functionality. As I know some of you have a similar request, I will explain my approach here, and of cause publish the sourcecode of my library below.

    What you get…

    But first of all, let me show you what you can expect. So you can decide to stop reading my article right at this point 😉

    I designed a new Class DynamicPropertyCollection which is a container of all new added properties. You will add a Domain Property of this type to your Domain Class at design time and then you can add more properties to this collection at runtime. I will care for showing these properties in the Properties Window.

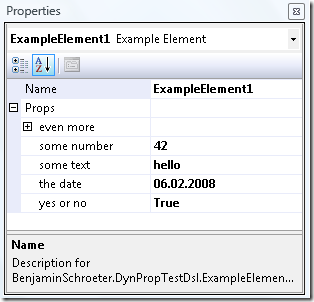
    prop14

    You can see here the Properties Window while one Example Element is selected. The Name is the only regular designed Domain Property. The field Props is also specified at design time as a Domain Property of the type DynamicPropertyCollection, but the user can not insert any text to this row. But as you can see with the minus symbol in front of the Props row there are some subproperties. These are the dynamic added properties and you can change these list at runtime as promised. The subproperties can contain any data type that can be used with the properties grid, and even more DynamicPropertyCollections. The even more row contains such an element:

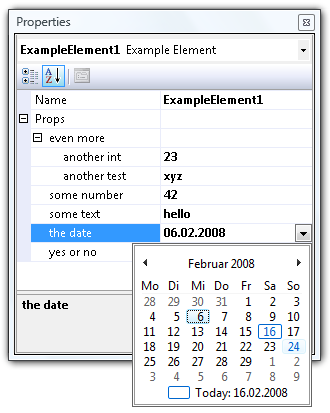
    prop24

    There are two additional properties hidden below the even more row and as you can see, all user interface features like the calendar on DateTime values are supported out of the box (all this comes with the great properties grid control).

    Maybe you can claim I did not really keep all my promises because I did not add additional properties to the Example Element rather to using these sub properties. That’s right, but I think it’s very close and there are many advantages with this: You do not need to add code to the Domain Class, the Shape or anywhere within the generated classes and you can only use my DynamicPropertyCollection class as a black box (although I try to whiten it here a little bit).

    How does all this magic work?

    The trick comes with the ICustomTypeDescriptor Interface. Normally the properties grid will use reflection to access all public properties of a class and shows these properties in the grid. But if you implement this interface the grid will ask you for a list of all properties in a PropertyDescriptorCollection. This question I can answer with another list of properties each time and so I can show dynamic properties for each element.

    In my code you find a DynamicPropertyCollection class that implements this interface and uses for most methods a default implementation, but some special code for public PropertyDescriptorCollection GetProperties(Attribute[] attributes). Internally there is a private readonly List<DynamicProperty> properties that contains all these properties.

    The DynamicPropertyDescriptor objects returned by GetProperties() contain every information the property grid needs to show the list. Further more it will delegate get and set operations for the properties to this DynamicPropertyDescriptor which stores the values in the underlying DynamicProperty objects.

    As a user you will hardly see the DynamicPropety or DynamicPropertyDescriptor class and need not to worry about these details. You can only work with the public interface of DynamicPropertyCollection:

    public void AddProperty(string name, Type type)
    public void AddProperty(string name, Type type, object value)
    public void RemoveProperty(string name)
    public bool ExistsProperty(string name)


    public
    Type GetPropertyType(string name) public object GetPropteryValue(string name) public void SetPropertyValue(string name, object value)

    With this few classes and only few lines of code you get the properties shown as in the screenshots above!

    …but how to serialize?

    But this is only half the way to go. We need to serialize all the properties with the Domain Model and deserialize them when loading a model. Since the DynamicPropertyCollection is part of the Domain Class as a Domain Property this seems to be the right and natural place to store all the values. The DSL Tools will use the TypeConverter of each type to convert the object to a string, so we have to provide a TypeConverter for the DynamicPropertyCollection:

    public class DynamicPropertyCollectionTypeConverter : ExpandableObjectConverter

    and attach this TypeConverter to the DynamicPropertyCollection:

    [TypeConverter("BenjaminSchroeter.DynamicDslProperties.DynamicPropertyCollectionTypeConverter")]

    public class DynamicPropertyCollection : ICustomTypeDescriptor

    (There is a known issue and a workaround I described here with the TypeConverterAttribute and the DSL Tools…)

    The DynamicPropertyCollectionTypeConverter inherits from ExpandableObjectConverter to provide the expandable functionality in the properties grid, but all the other code is used for serialization only.

    I have to provide Code to convert from and to string. In my string representation I have to store all properties with there name, the type and the value, of cause. To store the different values I use a TypeConverter and convert the objectvalues to string as well. So you can only use types that can be converted to and from string, but that are all types most people use in the Properties Window since the user can only type and see strings there.

    The representation in the XML file of your DSL will look like this:

    <exampleElement name="ExampleElement1">
    <props>
    name_1="some text" type_1="System.String" value_1="hello"
    name_2="some number" type_2="System.Int32" value_2="42"
    name_3="yes or no" type_3="System.Boolean" value_3="True"
    </props>

    As you see, it is still human readable.

    What should I do?

    If you only want to use the library look at the following steps:

    1. Compile the DynamicDslProperties code as a library and add a reference to your DSL project. Maybe you want change the key file for signing.
    2. In the DSL Explorer you have to add a External Type with Namespace = "BenjaminSchroeter.DynamicDslProperties" and Name = "DynamicPropertyCollection".
    3. Now you can add a Domain Property of type DynamicPropertyCollection to any Domain Class.
    4. Change the Default Value of the property to " " (one space only). This is crucial to initialize the class on creation of new Domain Elements! Otherwise the new Domain Element will have a null value for this property and you must handle it at various places.
    5. In the DSL Explorer look at the Xml Serialization Behavior of the property of this Domain Class and change the field Representation from Attribute to Element. This step is optional but provides you a much nicer XML representation.
    6. Add somewhere code to add properties to the DynamicPropertyCollection. Remember to wrap this and all changes to properties in a transaction.

    For testing and debugging

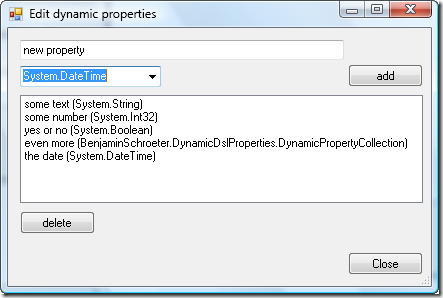
    For a fast jumpstart and to test the features I provide a small dialog to add and delete properties.

    edit6

    You can simply add some code to a shape to open this dialog on double click.

    partial class ExampleShape
    {
      public override void OnDoubleClick(DiagramPointEventArgs e)
      {
        ExampleElement elem = e.HitDiagramItem.Shape.ModelElement as ExampleElement;
        if ( elem != null)
        {
           EditDynamicPropertiesDialog f;
    f = new EditDynamicPropertiesDialog(elem.Props, elem.Store); f.ShowDialog(); } base.OnDoubleClick(e); } }

    Of cause this window and the DoubleClick event are only good while debugging and testing. For real world projects you will use the public interface described above to add and remove properties.

    The code

    In the zip file you will find the whole sourcecode of the described library to use in your projects. Just leave my copyright and the link to this article in the header of each file and do not expect any warranty. If you extend the library, find or fix some bugs I would appreciate a comment here.

    There is also a whole DSL project in the zip file to try my code right away.

    dynamicdslpropertiessource.zip

    Update

    This code is now part of the JaDAL – Just another DSL-Tools Addon Library project. Please download the current version from that page. The download over at CodePlex contains the source code described here, an example DSL language and the library as a binary. Future enhancements of the code will be published there, too.

    Be careful when sorting lists of structs!!

    Tags: ,
    No Comments »

    Working on a private project we stumbled over an interesting behavior in the .NET sorting routines. There is a crucial difference between sorting (generic) lists of structs and sorting lists of objects.Take a look at this code:

    (I am avoiding properties to shorten the example)

    internal struct fancything : IComparable<fancything>

    {

        // Counters

        public static int ctor_counter = 0;

        public static int getsortkey_counter = 0;


        public string sortkeystring;

        public int sortkeyint;


        public fancything(int rndbase)

        {

            sortkeystring = null;

            sortkeyint = rndbase;

            ctor_counter++; // Count number of ctor-calls

        }


        internal string GetSortkeystring()

        {

            if (sortkeystring == null)

            {

                sortkeystring = sortkeyint.ToString();

                getsortkey_counter++; // Count inits of sortkey

            }

            return sortkeystring;

        }


        public int CompareTo(fancything other)

        {

            return this.GetSortkeystring().CompareTo(other.GetSortkeystring());

        }

    }


    It’s a simple class that implements IComparable; Items are compared by the return value of the method GetSortkeystring. GetSortkeystring returns the variable ‘string sortkeystring’ and – if sortkeystring is null – initializes it with the .toString()-value of a random number that was to the constructor of the calls when creating the object.

    Don’t look at the code too critical; it’s just the shortest code to illustrate the idea. In our real case the initialization of the sortkeystring is a very costly method that you wouldn’t want to call more often than absolutely necessary.

    Now lets just get 100 random items und have them sorted.

    static void Main()

    {

        // Get 100 random elements

        Random r = new Random();

        List<fancything> list = new List<fancything>();

        for (int i = 0; i < 100; i++)

            list.Add(new fancything(r.Next(0, 100)));


        Report("Before");

        list.Sort();

        Report("After");


        //Make sure it has been sorted

        foreach (fancything ft in list)

            Console.Write(ft.sortkeystring + " ");


        Console.ReadLine();

    }


    private static void Report(string moment)

    {

        Console.WriteLine(

            string.Format(

                "{0} sorting. ctor_counter {1}, getsortkey_counter {2}",

                moment,

                fancything.ctor_counter,

                fancything.getsortkey_counter));

    }


    What would you expect as output?

    Before sorting. ctor_counter 100, getsortkey_counter 0
    After sorting. ctor_counter 100, getsortkey_counter 100

    Right. Now lets make a little change and turn the class into a struct.

    struct fancything : IComparable<fancything>

    What would you except as output now? The same as above? Dude, you are dead wrong!

    Before sorting. ctor_counter 100, getsortkey_counter 0
    After sorting. ctor_counter 100, getsortkey_counter 770!!!!!

    Can you believe it? Neither couldn’t we and it took Benjamin a while to track it down. What is going on here? I didn’t know, so here is my first theory: The sortkeystring must be null again and again, since there is no other way to increase the getsortkeycounter. Doing the .Sort, .NET seems to create new instances of fancyitem all the time, which makes perfect sense: sortings objects is all about pushing around pointers, but structs are not "pointered at". So their real values have to be taken out of the list und put in at an other place in that list. But why does the value of sortkeystring get lost somewhere. A bug?

    May I confuse you more?

    Let’s try something else. In the example we initialized the sortkeystring as late as possible (lazy loading – remember. it’s a costly, costly method). But, come on, for the sorting we need each sortkeystring  anyway, so why no initializing it in the constructor?

    internal struct fancything : IComparable<fancything>

    {

        // Counters

        public static int ctor_counter = 0;


        public string sortkeystring;

        public int sortkeyint;

        public fancything(int rndbase)

        {

            sortkeyint = rndbase;

            sortkeystring = sortkeyint.ToString();

            ctor_counter++; // Count number of ctor-calls

        }


        internal string GetSortkeystring()

        {

            if (sortkeystring == null)

                throw new Exception("Help! My value is lost.");


            return sortkeystring;

        }


        public int CompareTo(fancything other)

        {

            return (this.GetSortkeystring().CompareTo(other.GetSortkeystring()));

        }

    }

    The getsortkey_counter is gone, sortkeystring gets initialized in the constructor and GetSortkeystring() throws an exception if the value is lost.

    The result was unexpected to me again. I was prepared for an exception, because we saw that the value gets lost. But no exception occurred.

    Before sorting. ctor_counter 100.
    After sorting. ctor_counter 100.
    (and the list is still sorted properly)

    What the hack is that supposed to mean? Let’s take a moment to sit down, have a drink and sum up the facts:

    1. the constructor of the struct is officially called 100 times in all cases. Fine.
    2. the GetSortkeystring()-method is called a lot. For each comparison. Fine.
    3. in the first example the value of sortkeystring gets lost and has to be re-Initialized. Not fine but we have to take it.
    4. in the second example the value of sortkeystring is initialized in the constructor and does not get lost. Fine, that’s what one would expect.

    I really didn’t have no idea why 3 works so much different from 4. I played more and can add two more facts:

    1. value types never get lost
    2. reference types get lost like sortkeystring in the first example – as long as they are not initialized in the constructor.

    Is there a kind of protection for variables, that are initialized in the constructor? I can’t believe that.

    Last night in the bedroom…

    …my girl-friend was already asleep, so I could mull this all over again… and was struck by the truth. Doh, it’s so simple:

    As you know objects are called by reference (meaning "a pointer is passed") while structs are passed by value. Let’s say a passed struct lives as an independent copy of the original in the called method. Changes to this copy do not effect the original at all. Now List.Sort roughly works like this:

    1. Find two elements to compare
    2. Compare elements.
    3. Switch their places if necessary

    Whatever step 2 does, sooner or later it has to call

    public int CompareTo(fancything other).

    Ups… call by value. Now ‘other’ is of course just a copy and sortkeystring gets initialized in this copy – which does not affect the original in the list at all. And next time an original is compared… Do I have to say more?

    This also explains, why variables, that have been initialized in the constructor, don’t get lost. Their values already live in the original – a pretty safe place to be in a struct world 🙂

    Very satisfactory, I even don’t have to wake up my girl-friend! Good night, guys!

    Using a mobile phone as GPS logger

    Tags: , ,
    No Comments »

    With the Java software GPSLog you can use an ordinary Bluetooth GPS receiver with a Bluetooth enabled mobile Phone as a GPS Data logger. Only connect the two devices and start logging with the GPSLog software. It is very easy and you can simply create nmea log files and use it with other GPS software like PhotoTagStudio or translate these log files using GPS Babel.

    I use GPSLog only to display the current position and the current time of my GPS Logger to take a photo of the display with the current time displayed. In PhotoTagStudio you can use such a picture to synchronize the GPS log time and the camera time.

    I wrote more about my GPS logger and GPS Babel in this article and more about GPS earlier in this blog.

    g-brief in LaTeX and “\Telefon already defined” problem

    Tags:
    3 Comments »

    g-brief is a document class for LaTeX to write German standard letters. I like this document class very much and prefer it much over the Microsoft Word letter templates.
    But on some machines I get the following error message when compiling the document using the MiKTeX packages:
       LaTeX Error: Command \Telefon already defined.

    There is a simple solutions to resolve this error. You can just patch the package. Somewhere below the LaTeX directory you should find the marvosym.sty file. Open this file with a text editor of your choice an search for a line like this:
       \newcommand\Telefon{\mvchr{84}}
    There you can change the name of the command \Telefon to something like \Telefonsymbol or the even better way (but I did not test this one): replace \newcommand with \def and leave Telefon as it is.

    Another g-brief tip: you can define the following three elements on your document to turn on these various features:
    \fenstermarken
    \faltmarken
    \trennlinien

    WP Theme & Icons by N.Design Studio
    Entries RSS Comments RSS Log in